
In this week’s episode of The Shutter Button Podcast, I talk about some of the keys to effective project planning, as well as some of the ways I generate ideas for projects of my own. Enjoy and, as always, thanks for listening!
Episode 004: Photowalks! The What's and Why's
In this week’s episode of The Shutter Button Podcast, I talk about the benefits of photowalks, why you should practice going on them, and also some of my experiences and the lessons I’ve learned when shooting my own work. Enjoy and, as always, thanks for listening!
Episode 005: Formal Education vs. Free-Shooting! What's the Difference?
In this week’s episode of The Shutter Button Podcast, I talk about the pros and cons between receiving a formal education and free-shooting when you’re first starting out. I also talk about some of the benefits of continuing education and workshops for more intermediate photographers. Enjoy and, as always, thanks for listening!
Episode 006: Why You Should Wait Before Buying That Fancy New Lens!
In this week’s episode of The Shutter Button Podcast, I talk about Gear Acquisition Syndrome, specifically, when it applies to purchasing new lenses. I talk about all the different questions you need to ask and all the aspects you need to consider before spending a lot of money on a new lens. Enjoy and, as always, thanks for listening!
A Short Introduction to Focus Stacking
Hey everybody! Zig here!
Today I’d like to showcase an image I took on my recent trip to Mianus River Park and talk a bit about my process of retouching and focus stacking when shooting macro photography. It all starts out with a series of images and in this case, it’s a series of photographs I captured of a mushroom which I found growing on the side of a fallen log. Take a look at the images and notice how each has a different portion of the mushroom in focus, starting from the foremost edge of the mushroom and moving all the way to the back.


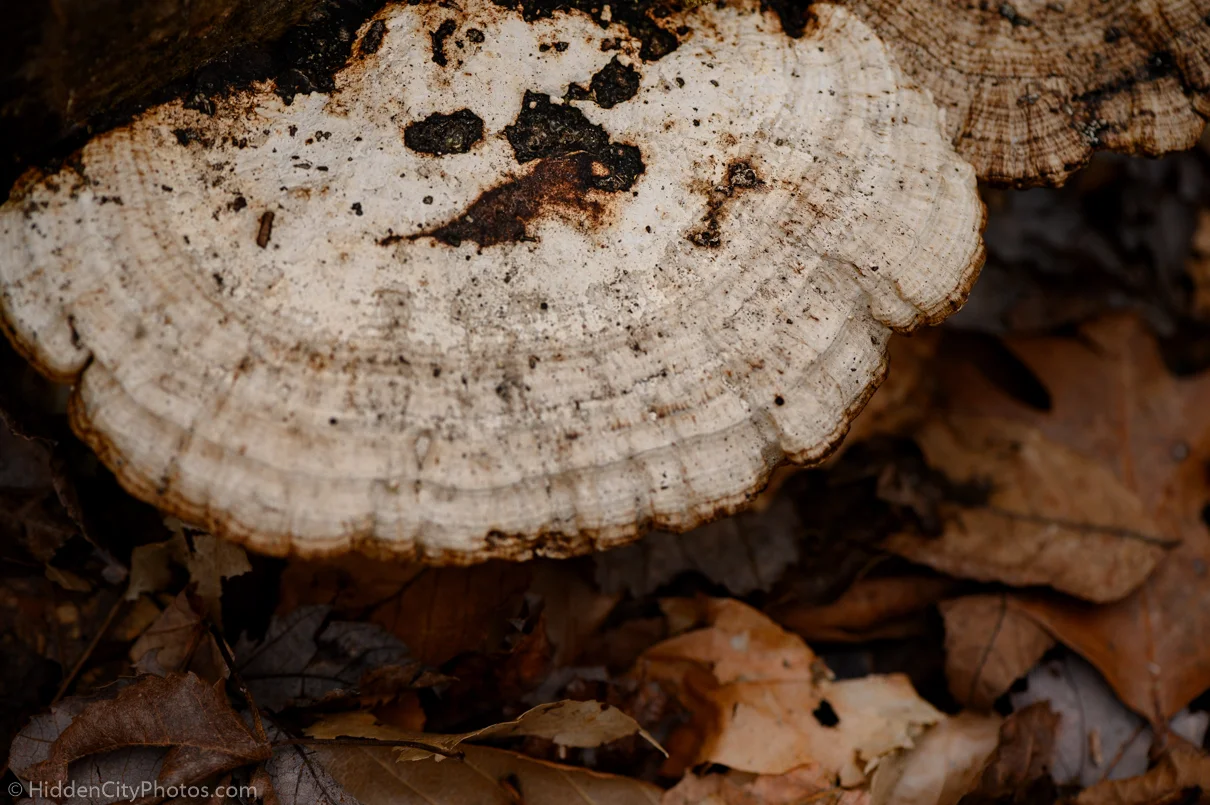
To capture these, I mounted my Nikon Z6 on a tripod, composited the image, and then used the “Focus Shift” feature that is built into the Nikon Z6. The way that focus stacking works is that focus on the foremost part of the object you want to photograph, take a photo, move the focus towards to the back while overlapping your first photograph slightly, and then repeating the process until you have captured enough “slices” that each contain a different piece of focus for the target image. The focus shift feature in the Nikon Z6 automates this process and made it very quick and easy to get the results that I wanted.
After I’ve taken the photos, I import everything into Lightroom and make all my processing adjustments to every image in the stack before exporting the full-sized JPEG files and opening them in Photoshop. What I specifically do is open the first image in the stack in Photoshop and then import and rasterize every other image in the stack into that same session. At this point, my layers look a bit like this;
After this step, I select every layer in the layers tab and click on Edit > Auto-Align Layers and then choose to let Photoshop decide on the best way to automatically align them.
Once Photoshop aligns every layer, I then go in and make any additional adjustments like the selective removal of focus from some of the layers or, if there are many images in the stack, more extremely out-of-focus areas to prevent potential ghosting when I merge everything in the next step. After I’m content with the layers in the stack, I then click Edit > Auto-Blend Layers and let Photoshop automatically merge everything together. The final image looks like this, with the expected result being that everything is in focus.
This is a bit of a simplified breakdown of my process, but I hope that it gives the structure you would need to be able to repeat a similar process or implement it into your own workflow. I am always adjusting and improving the process as I learn some of the pit-falls of shooting macro photography and I am always open to hearing suggestions about how you might change or alter this style of processing and stacking!
I’ve only recently started to integrate this technique into my routine and I’ve already seen examples of photos where I would not want to keep everything in focus. However I think that focus stacking, and practicing taking multiple images with different depths of field, allows me to have the freedom and control I’m looking to get with my macro photography. It helps me capture the crisp, sharp edges that I like, as well as selectively keep things out-of-focus when I want to. Anyway, that’s all I have for today. I hope you have a great week shooting and I also hope that I was able to give a little insight into how I produce some of my macro images. I’ll see you all next week in another episode of the Shutter Button Podcast where I’ll be talking about formal education vs. deliberate practice, and my experience with finding a balance between both.
Thanks and all the best,
- Zig
At-Home Studio Photography
Hey everyone, Zig here! Happy Wednesday once again.
So last week I released the first episode of my photography podcast, “The Shutter Button Podcast” and I have to say that I had a lot of fun making it, as well as a fair amount of stress. However, I think now that I’ve gotten through the first episode, I’ve learned a few things about the recording process that should make it easier when I do episode 2 for next week! I hope you’re looking forward to it as much as I am, I’m going to be going over the topic of building a portfolio; things like which services to use and what kind of projects you can do to help fill your portfolio with variety. So until then, please stay tuned!
Today, however, I’d like to talk about an equipment purchase I made the other day to build a small home studio. My goal was to put together a small kit of equipment I could use for several types of projects; product photography, macro photography, experimental art photography, and a few other ideas that I haven’t fully thought about yet. I decided that for this kind of setup I would need a few things;
A light source, stand, and umbrella diffuser. (For now, just one light will do, but at some point, having two light sources will be a great way of expanding the potential of my at-home projects.)
A light tent for product photography.
A table to work on. (Anything will work, as long as it’s sturdy!)
A glass or acrylic watertight box/fish tank. (I’m planning to use this to experiment with taking macro photos of underwater subjects!)
Overall, I don’t think this is a very demanding list, but depending on the equipment, it could get very expensive very quickly. I did quite a bit of shopping around and exploring on different retailers and settled on getting everything from a few different places. For the table, I purchased a very inexpensive folding table off of amazon and for the fish tank, I thankfully had an unused one from a previous freshwater set up in my house. I picked out all of the remaining items on my shopping list from B&H Photo Video. I ended up picking out the following items to complete my setup;
With this equipment, I think I’ve got the perfect setup to start experimenting and learning how to work with certain still life subjects and items for product photography. I’m also very excited to have a singular spot that I can use whenever I’m feeling creative and want to shoot. Also, because this equipment is so portable, I’ll be able to move it around the house very easily in case there’s a particular scene or area that I want to shoot in. I’m looking forward to it all!
Overall, the price was about ~$350 for everything, and I think that it’s relatively fair for how much and what I bought. Only time will tell how the quality compares to other brands, but I’m feeling very optimistic about being able to shoot more frequently at home.
Anyway, that’s all for now, I hope this blog post was able to give some insight into what I’d like to be working on soon. In a future post, I will also be bringing up the topic of finding and photographing bands, but that will be at a later date once I get some experience!
That’s everything I’ve got for today so I hope you all have a great week and I’ll see you all in the next post!
- Zig
I'm Producing a Photography Podcast!
Hey, everyone. Ziggy here again. I wanted to talk about a project I’m currently writing and producing in my spare time; a photography podcast! It currently has the very tentative name, “The Shutter Button Podcast: We’re Already Halfway There,” and at its core, I’ll be using it to talk about a ton of subjects that can be daunting for both beginners and hobbyists, alike.
Each episode, I plan to talk about a very specific subject for about 5-10 minutes with the goal of providing listeners with a set of steps they can follow to practice and integrate that new information into their toolkit. For example, one of the first episodes is about project planning and some of the key factors that should help break it down into simpler, more digestible terms. I discuss how to plan and manage a budget for both time and money, as well as scouting for shooting locations and even giving some tips on how to brainstorm and keep track of project ideas.
My current goal is to finish the writing for the first four episodes, as well as the outlining for the following four, for a total of eight episodes that I’ll be releasing either once per week or twice per month. The release schedule is still being worked on, but I’m planning on making the podcast available on all of the major platforms, as well as right here on my blog!
With all of that being said, I still have a lot of work to do, but I’m excited and looking forward to the remainder of this initial writing period and moving into the recording/production steps.
As always, thanks for all of the support and I hope to see you all again real soon. See you next week!
- Zig
Postcards!
Have you ever wanted to share your photography with friends and family in a cheap, easy, and physical medium? So did I! A few weeks ago. I had been looking for a way to materialize my work so that I could share my photography with my friends and family, aside from just giving them prints. I thought about several project ideas including calendars, greeting cards, and even photo books, but none of them seemed to get to the heart of what I wanted to do. I wanted a simple, personal way of sharing my work, and that’s when I stumbled upon the idea of printing postcards!
I’ve been a fan of printing my own work since earlier in the year when I purchased a Canon Pixma PRO 100 printer, as well as some fine art printing papers, but I had never attempted to print postcards before. My first step was to get some paper, but I definitely rushed when picking out my first batch of printing sheets. I did a quick lookup for postcard-sized (4”x6”) paper on Amazon and bought a cheap stack that seemed alright, but when I finally received it and did a few draft prints, I realized that I had made a very dumb mistake. I hadn’t bought coated paper and with every print, I was getting a very cheap-looking, low quality, blurry mess. I scrapped the stack and put it on my art shelf (in case I could find a future use for them) and I went back online to do some more research. I found a few recommended brands, but eventually settled on buying a stack of 50 sheets of postcard photo paper from Red River Paper Co. They arrived pretty quickly and in great packaging (much better than the sheets I bought from Amazon). Once I unboxed them, I got my printing gloves and I started testing right away!
I had to adjust my print settings a little bit because the color and brightness was a little off, but after some finetuning, I started seeing the results I had been looking for. The last thing I needed to do was print a postcard-y template on the backside so that I could write in addresses and a short message. I booted up photoshop and developed this quick template using example I found of other postcards on Google Images:
Feel free to use this template for your own postcards!
After printing a couple of test prints, I realized that it’s better to print the backside with the template first before printing the photo itself because of possible damage along the edges, but after fitting that into my printing workflow, I started coming up with some great prints! Overall, I was very pleased with both the quality of the paper and the prints and I felt great knowing that I had learnt a new skill and service I could even provide to future clients of mine.
What about you? Have you printed your own postcards before or considered it? Do you have any other ideas about bringing your photos into “the real world?” If so, please feel free to leave them in the comments below! I’d love to hear from all of you!
Anyway, I’ll see you guys in the next post. Have an awesome week!
- Zig